前言
大概是研二那会儿,经常需要利用python爬取数据,再进行处理和数据可视化,现在暂时没什么事情就重新梳理一下。
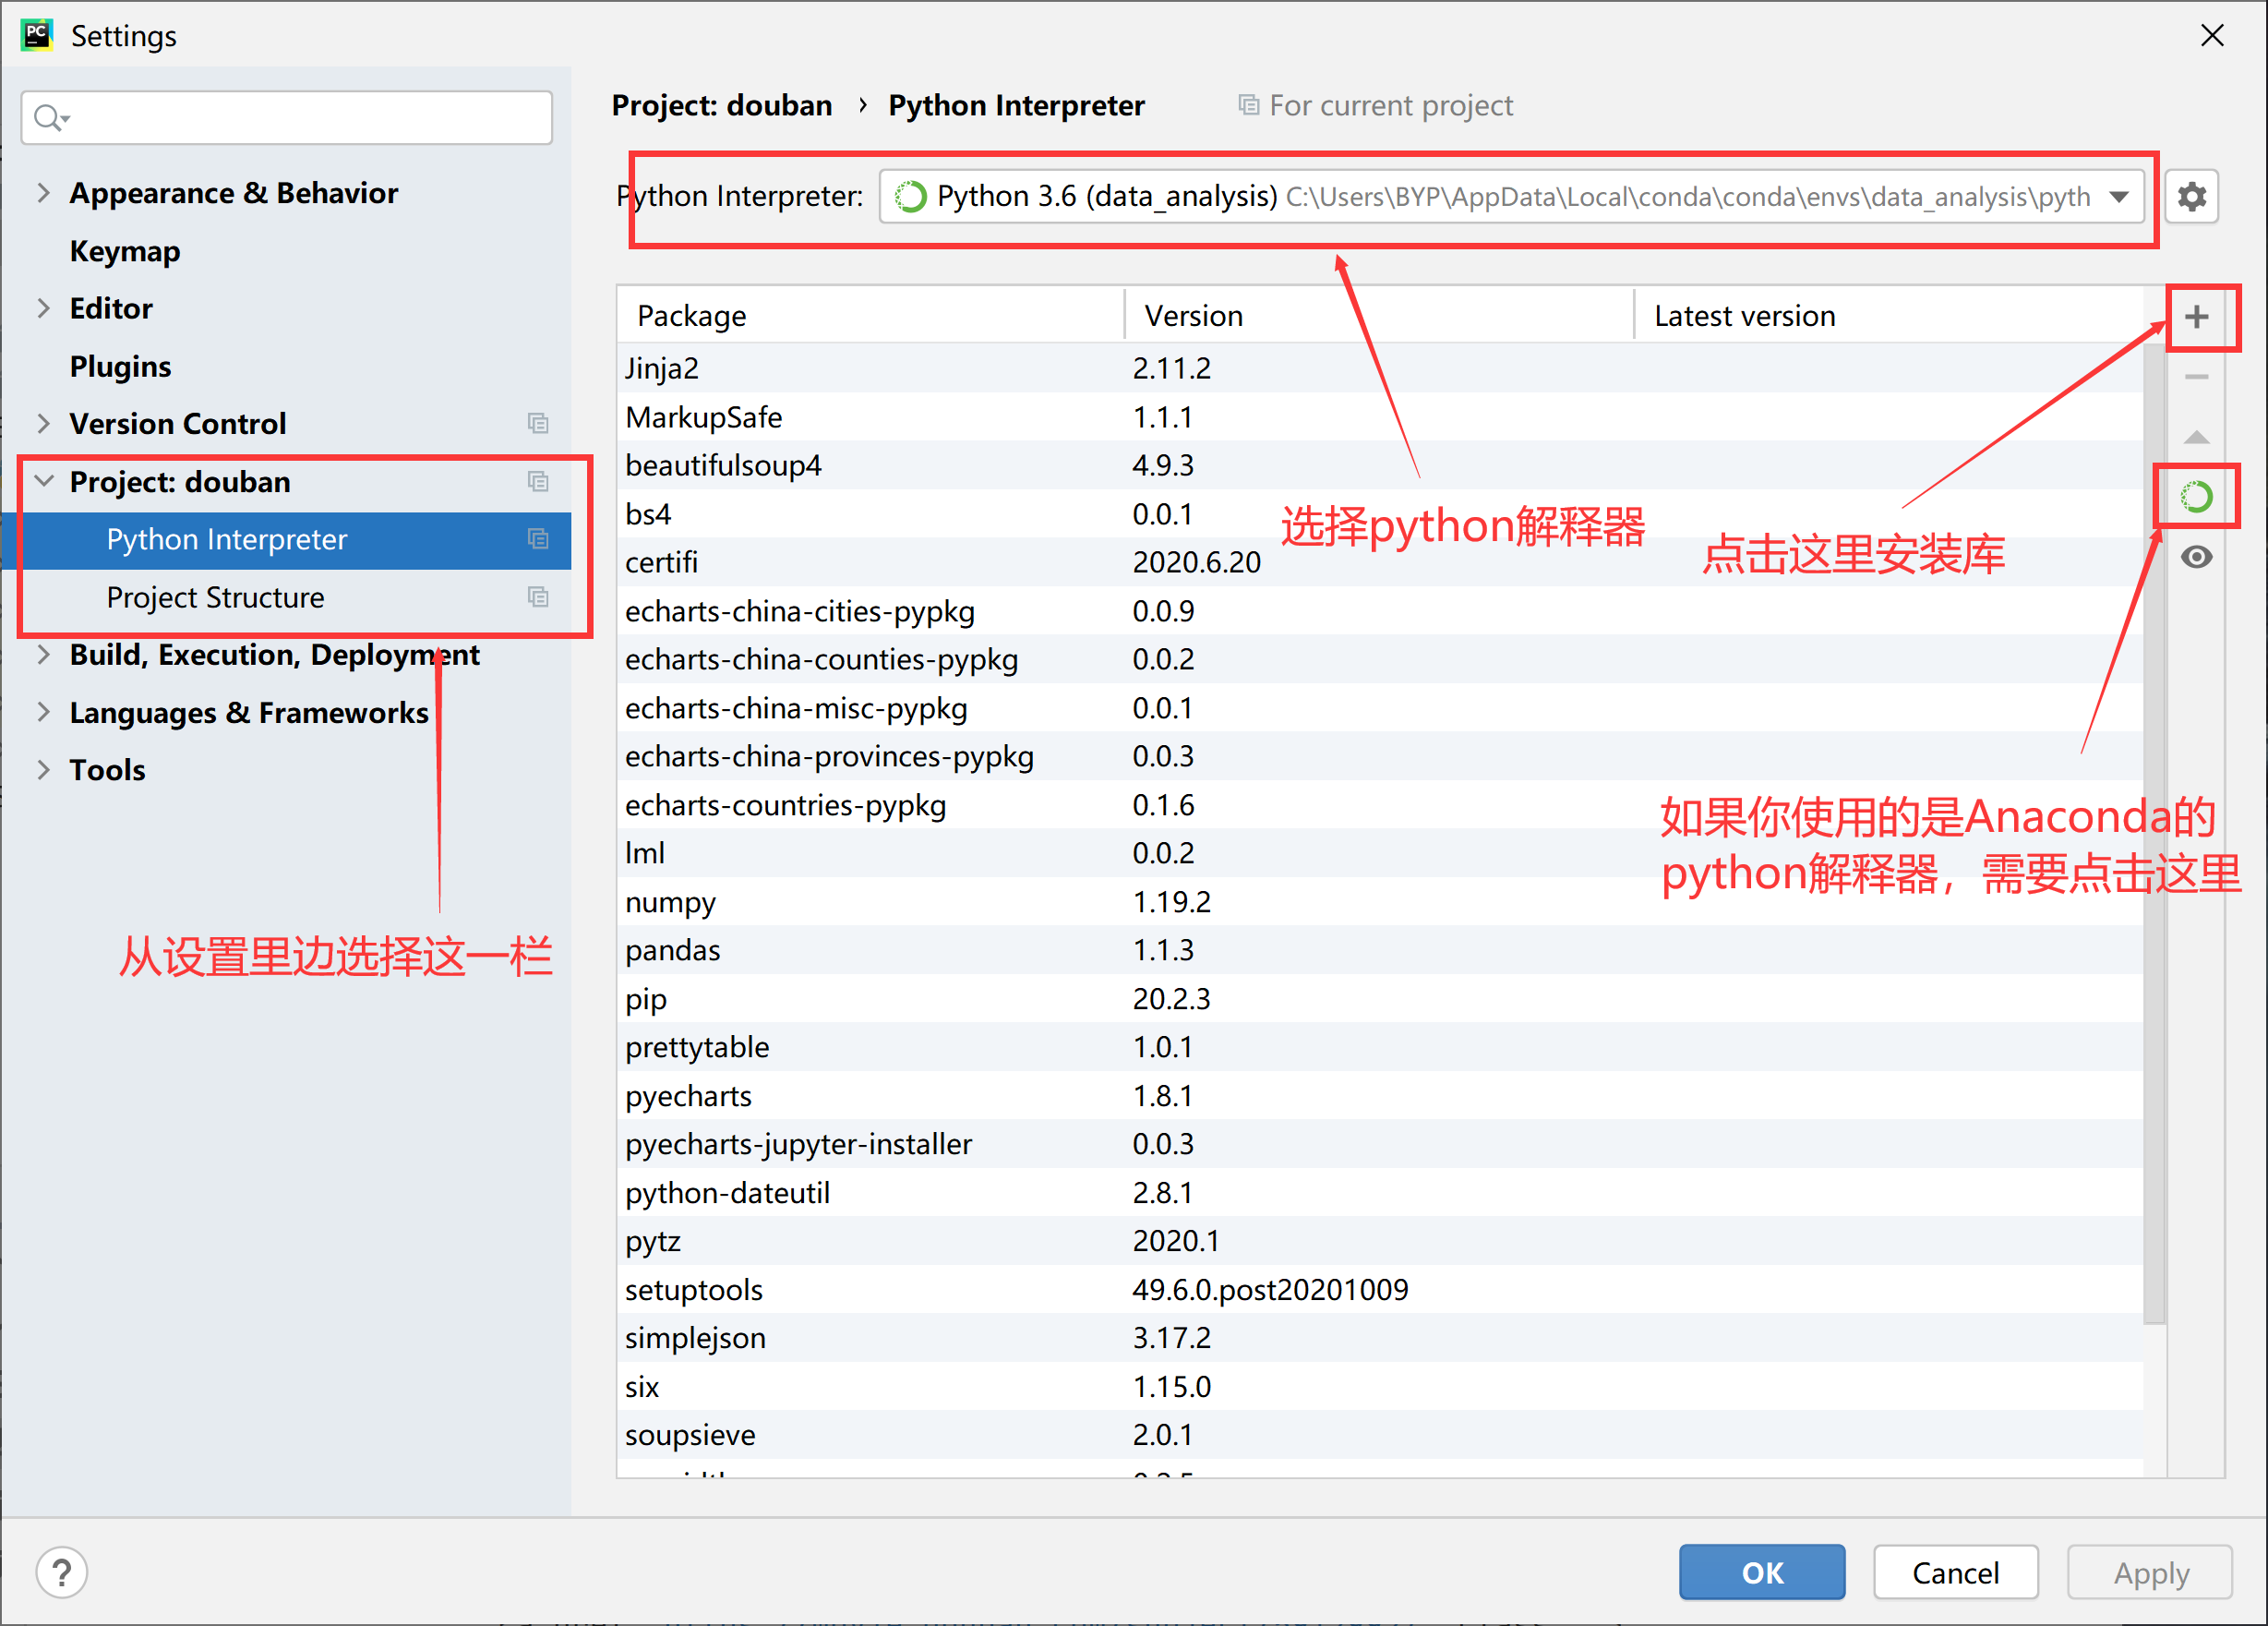
1.搭建环境
1.1 Conda创建独立环境
我采用的是Anaconda来管理python的包,首先查看当前所存在的环境
- 列出当前存在的环境
1 | $ conda env list |
可以看到当前只存在一个root环境
创建虚拟环境
接下来可以用如下命令创建一个名字为data_analysis,python版本为3.6.3的虚拟环境。
1 | $ conda create -n data_analysis python=3.6.3 |
哦豁,好像访问不了,更换一下conda的镜像源(参考1.2)。
以上方式创建的环境在默认路径下,但可以通过以下方式指定路径:
1 | conda create --prefix="D:\\my_python\\envs\\my_py_env" python=3.6.3 |
其中”D:\my_python\envs"是路径名,”my_py_env” 是环境名.
进入环境
1
activate my_py_env
在windows系统cmd下通过以上命令即可进入my_py_env环境,如果在linux系统下,需要使用:
1
source activate my_py_env
退出环境
1
2
3
4#Windows
deactivate
#Linux
source deactivate使用conda管理包
1
2conda install -n my_py_env package_name
conda uninstall -n my_py_env package_name只需要在conda命令中通过 -n 显示指定python环境即可
删除环境
1
conda remove -n my_py_env --all
1.2 Conda更换镜像源
- 查看配置文件
1 | conda config --show |
添加清华源
1
2
3
4
5
6conda config --add channels https://mirrors.tuna.tsinghua.edu.cn/anaconda/pkgs/free/
conda config --add channels https://mirrors.tuna.tsinghua.edu.cn/anaconda/cloud/conda-forge
conda config --add channels https://mirrors.tuna.tsinghua.edu.cn/anaconda/cloud/msys2/
# 设置搜索时显示通道地址
conda config --set show_channel_urls yes添加中科大源
1
2
3
4
5
6
7
8conda config --add channels https://mirrors.ustc.edu.cn/anaconda/pkgs/main/
conda config --add channels https://mirrors.ustc.edu.cn/anaconda/pkgs/free/
conda config --add channels https://mirrors.ustc.edu.cn/anaconda/cloud/conda-forge/
conda config --add channels https://mirrors.ustc.edu.cn/anaconda/cloud/msys2/
conda config --add channels https://mirrors.ustc.edu.cn/anaconda/cloud/bioconda/
conda config --add channels https://mirrors.ustc.edu.cn/anaconda/cloud/menpo/
conda config --set show_channel_urls yes换回默认源
1
conda config --remove-key channels
在linux下可以将以下配置文件写在
~/.condarc中;在Windows下配置文件在C://User/用户名/.condarc1
2
3
4
5
6channels:
- https://mirrors.ustc.edu.cn/anaconda/pkgs/main/
- https://mirrors.ustc.edu.cn/anaconda/cloud/conda-forge/
- https://mirrors.tuna.tsinghua.edu.cn/anaconda/pkgs/free/
- defaults
show_channel_urls: true
1.3安装所需包
- 通过命令行来执行
1 | conda install pandas |
通过pycharm的包管理来进行安装
2.获取数据
通常情况下,我们可以采用网络爬虫来获取数据。
2.1请求并获取数据
通常情况下,可以采用urllib来请求数据
urllib
示例
1 | def askUrl(url): |
2.2解析数据
通常使用bs4、re来解析数据
bs4
1
2
3
4
5
6
7
8
9
10
11
12
13
14
15
16
17
18
19
20
21
22
23
24
25
26
27
28
29
30
31
32
33
34
35from bs4 import BeautifulSoup
file=open("./taobao.html","rb")
html=file.read().decode("utf-8")
bs=BeautifulSoup(html,"html.parser") #使用html解析器
#1.标签及其内容
# print(bs.title)
# print(bs.title.string)
#2.标签里的内容
# print(bs.head.attrs)
#3.整个文档
# print(bs)
#4.comment
# -----
#文档的遍历
#print(bs.head.contents)
# print(bs.head.contents[1])
#文档的搜索(经常使用)
#字符串搜索,会查找完全匹配的内容
# t_list = bs.find_all("a")
# print(t_list)
#正则表达式搜索
import re
t_list=bs.find_all(re.compile("a"))
print(t_list)
re
1
2
3
4
5
6
7
8
9
10
11
12
13
14
15
16
17
18
19
20
21import re
# 创建模式对象
pat = re.compile("AA") # 此处的AA,是正则表达式,用来验证其他的字符串
m=pat.search("AACBAA") # search是验证的内容
# search 会找到第一个匹配的地方
m= re.search("asd","Aasd") #以上的简写,前面的是模式,后面的是待验证的字符串
#Output:<re.Match object; span=(1, 4), match='asd'>
#findall
m=re.findall("[A-Z]","AsdaffdeaAfdsda") #findall是找到所有匹配的字符串
#Output:['A', 'A']
#sub
m=re.sub("a","A","abcdasd") #找到a,并用A进行替换
#Output:AbcdAsd
print(m)
示例
1
2
3
4
5
6
7
8
9
10
11
12
13
14
15
16
17
18
19
20
21
22
23
24
25
26
27
28
29
30
31
32
33
34
35
36
37
38
39
40
41
42
43
44
45
46
47
48
49
50
51
52
53
54
55
56
57
58
59
60
61
62
63#影片详情链接的规则
findLink = re.compile(r'<a href="(.*?)">') #创建正则表达式对象,表示规则(字符串的模式)
#影片图片
findImgSrc = re.compile(r'<img.*src="(.*?)"',re.S) #re.S 让换行符包含在字符中
#影片片名
findTitle = re.compile(r'<span class="title">(.*)</span>')
#影片评分
findRating = re.compile(r'<span class="rating_num" property="v:average">(.*)</span>')
#找到评价人数
findJudge = re.compile(r'<span>(\d*)人评价</span>')
#找到概况
findInq = re.compile(r'<span class="inq">(.*)</span>')
#找到影片的相关内容
findBd = re.compile(r'<p class="">(.*?)</p>',re.S)
def getData(baseurl):
datalist=[]
for i in range(0,10):
url=baseurl+str(i*25)
html=askUrl(url) #保存获取的网页源码
print("start jiexi "+url)
#逐一解析数据
soup=BeautifulSoup(html,"html.parser")
for item in soup.find_all('div',class_="item"):
# print(item)
# break
data=[] #保存一部电影的所有信息
item=str(item)
link=re.findall(findLink,item)[0] #re库用来通过正则表达式来查找符合要求的字符串
data.append(link)
imgSrc=re.findall(findImgSrc,item)[0]
data.append(imgSrc)
name=re.findall(findTitle,item)
if(len(name)==2):
data.append(name[0])
data.append(name[1].replace("/",""))
else:
data.append(name[0])
data.append("")
socre=re.findall(findRating,item)[0]
data.append(socre)
judgeNum = re.findall(findJudge,item)[0]
data.append(judgeNum)
inq=re.findall(findInq,item)
if(len(inq)!=0):
data.append(inq)
else:
data.append("")
bd=re.findall(findBd,item)[0]
bd=re.sub('/',"",bd) #去掉/
data.append(bd.strip()) #strip()去掉空格
datalist.append(data) #保存到datalist中
return datalist
2.3存储数据
xlwt
1
2
3
4
5
6
7
8
9
10
11
12import xlwt
# 创建一个workbook 设置编码
workbook = xlwt.Workbook(encoding = 'utf-8')
# 创建一个worksheet
worksheet = workbook.add_sheet('My Worksheet')
# 写入excel
# 参数对应 行, 列, 值
worksheet.write(1,0, label = 'this is test')
# 保存
workbook.save('Excel_test.xls')示例
1
2
3
4
5
6
7
8
9
10
11
12
13
14
15def saveData(save_path,datalist):
# 创建一个workbook 设置编码
workbook = xlwt.Workbook(encoding='utf-8')
# 创建一个worksheet
worksheet = workbook.add_sheet('豆瓣电影Top250')
colindex=["详情链接","图片链接","中文名","外文名","评分","评价人数","Inq","bd"]
for i in range(0,8):
worksheet.write(0,i,colindex[i])
for item in range(0,250):
print("d% item saving",item)
# data=datalist[i]
for j in range(0,8):
worksheet.write(item+1,j,datalist[item][j])
workbook.save(save_path)sqlite3
sqlite3.connect(DB_Name) #该 API 打开一个到 SQLite 数据库文件 database 的链接。 connection.cursor([cursorClass]) #该例程创建一个 cursor,将在 Python 数据库编程中用到。该方法接受一个单一的可选的参数 #cursorClass。如果提供了该参数,则它必须是一个扩展自 sqlite3.Cursor 的自定义的 cursor 类。 cursor.execute(sql [, optional parameters]) #该例程执行一个 SQL 语句。该 SQL 语句可以被参数化(即使用占位符代替 SQL 文本)。 connection.commit() #该方法提交当前的事务。如果您未调用该方法,那么自您上一次调用 commit() 以来所做的任何动作对其他数#据库连接来说是不可见的。 connection.close() #该方法关闭数据库连接。请注意,这不会自动调用 commit()。如果您之前未调用 commit() 方法,就直接关闭数据库连接,您所做的所有更改将全部丢失!def initDB(dbPath): sql=''' create table movie250 ( id integer primary key autoincrement, info_link text, info text ) ''' coon=sqlite3.connect(dbPath) cursor=coon.cursor() cursor.execute(sql) coon.commit() coon.close()1
2